
本教程用于使用v2-ui面板同时搭建Ss、Ws+Tls+Nginx+Cdn(cf)、Ws+Tls+Nginx+Web、Kcp、MTProto五种模式
0. 安装环境
- Vultr Vps
- Centos7 x64
1. 安装curl和vim
- RedHat系列:Redhat、Centos、Fedora等
yum install curl vim -y
- Debian系列:Debian、Ubuntu等
apt-get install curl vim -y
2. 安装v2ray UI
更新与升级都是这条命令,升级不会造成数据丢失,你所做的个性化面板设置也会保留。
全新安装后,在浏览器中打开 http://ip:65432 即可访问面板,默认用户名和密码都是 admin。
bash <(curl -Ls https://blog.sprov.xyz/v2-ui.sh)
3. 开放端口
- 首先检查端口是否开启:
firewall-cmd --query-port=65432/tcp --zone=public
- 开启端口代码
firewall-cmd --zone=public --add-port=65432/tcp --permanent
- 重新载入
firewall-cmd --reload
- 重启一个服务:
systemctl restart firewalld.service
4. 安装SSL证书
- 安装EPEL:
yum -y install epel-release
- 安装certbot用于签发SSL证书:
yum -y install certbot
- 申请SSL证书:
certbot certonly --standalone -d example.com
- 未来续订,请执行以下命令:
systemctl stop nginx
certbot renew
systemctl start nginx
注意
-
安装好后证书保存在/etc/letsencrypt/live/example.com目录
-
签发SSL证书时,如果已经安装了Nginx,请先关闭Ngnix,因为签发证书时需要用到80端口
-
由于要同时搭建Ws+Tls+Nginx+Cdn、Ws+Tls+Nginx+Web,所以需要申请两个不同域名的证书
5. 安装ngnix
1. 安装Nginx:
yum -y install nginx
2. 设置开机启动:
systemctl enable nginx
3. 新建一个Nginx站点配置文件:
vi /etc/nginx/conf.d/v2ray.conf
写入:
server {
listen 443 ssl;
server_name example1.com;
ssl_certificate /etc/letsencrypt/live/example1.com/fullchain.pem;
ssl_certificate_key /etc/letsencrypt/live/example1.com/privkey.pem;
ssl_protocols TLSv1 TLSv1.1 TLSv1.2;
ssl_ciphers ECDHE-RSA-AES128-GCM-SHA256:HIGH:!aNULL:!MD5:!RC4:!DHE;
ssl_prefer_server_ciphers on;
ssl_session_cache shared:SSL:10m;
ssl_session_timeout 10m;
error_page 497 https://$host$request_uri;
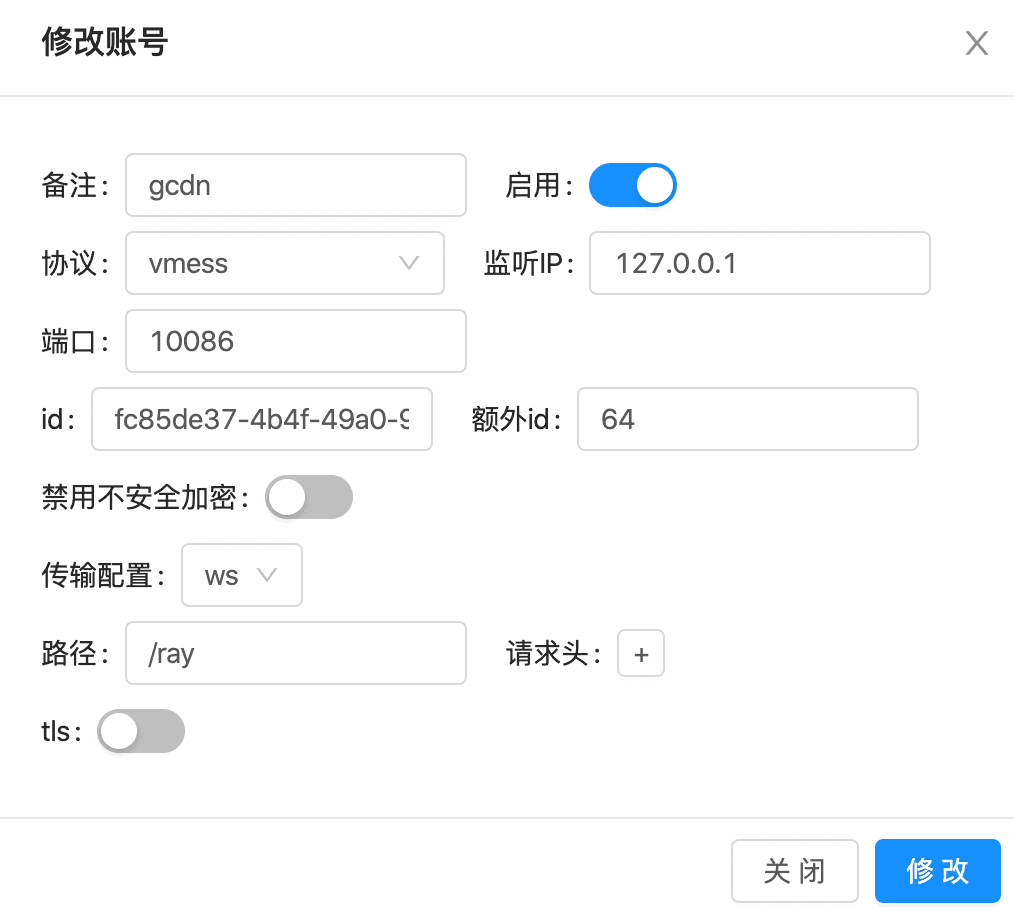
location /ray {
proxy_pass http://127.0.0.1:10086;
proxy_redirect off;
proxy_http_version 1.1;
proxy_set_header Upgrade $http_upgrade;
proxy_set_header Connection "upgrade";
proxy_set_header Host $http_host;
}
}
server {
listen 443 ssl;
server_name example2.com;
ssl_certificate /etc/letsencrypt/live/example2.com/fullchain.pem;
ssl_certificate_key /etc/letsencrypt/live/example2.com/privkey.pem;
ssl_protocols TLSv1 TLSv1.1 TLSv1.2;
ssl_ciphers ECDHE-RSA-AES128-GCM-SHA256:HIGH:!aNULL:!MD5:!RC4:!DHE;
ssl_prefer_server_ciphers on;
ssl_session_cache shared:SSL:10m;
ssl_session_timeout 10m;
error_page 497 https://$host$request_uri;
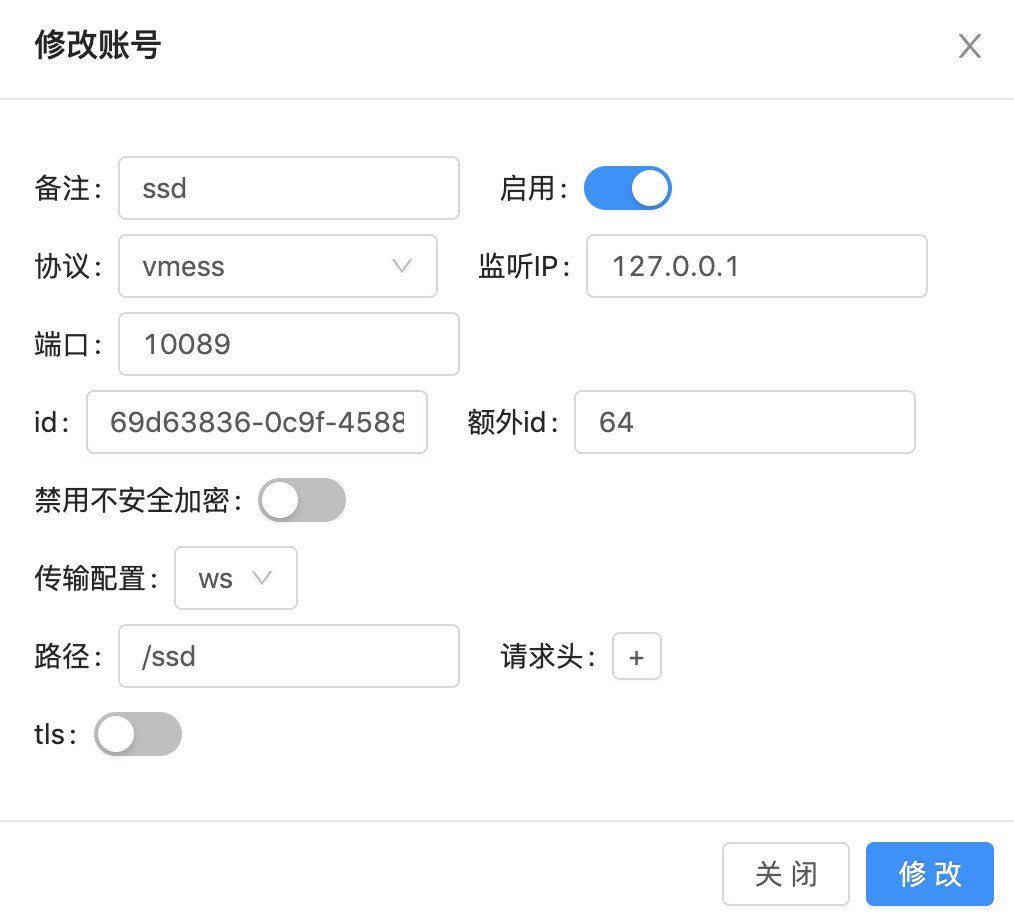
location /ssd {
proxy_pass http://127.0.0.1:10089;
proxy_redirect off;
proxy_http_version 1.1;
proxy_set_header Upgrade $http_upgrade;
proxy_set_header Connection "upgrade";
proxy_set_header Host $http_host;
}
}
其中443是网站端口同时也是V2Ray传输端口,127.0.0.1:10086/10089其中的10086/10089是监听端口,可以自行更改,然后防火墙放行所需端口,或者直接关闭防火墙,这里之所以需要两个,是因为需要同时支持两种WS+TLS模式。
4. 启动ngnix:
systemctl start nginx
5. 检查是否运行正常:
systemctl status nginx
两个都显示为绿色的active(running)则说明运行成功
6. 配置v2-ui服务端
建议先配置MTProto,因为需要修改v2-ui的配置模板,后期改容易导致面板崩溃,另外所有配置的端口记得一一打开,其中kcp要注意是打开udp端口,另外客户端也需要启动udp选项。
1. MTProto
v2-ui面板不支持一键配置,需要自行在面板设置中修改v2ray配置模板。
就目前来说,mtproto 已经不再建议使用,所以我就没有加了,除非 v2ray 之后优化了 mtproto,做了一个新的 mtproto 来,我才会加上此协议。如果确实需要的话,请自行在面板设置中修改v2ray配置模板。
在inbounds中添加:
     {
      "tag": "tg-in",
      "listen": "0.0.0.0",
      "port": '填写 MTProto 协议监听端口',
      "protocol": "mtproto",
      "settings": {
        "users": [
          {
            "secret": "使用openssl rand -hex 16命令生成"
          }
        ]
      }
    }
在outbounds中添加:
  {
      "tag": "tg-out",
      "protocol": "mtproto",
      "settings": {}
  }
在routing中添加:
{
        "type": "field",
        "inboundTag": [
          "tg-in"
        ],
        "outboundTag": "tg-out"
  }
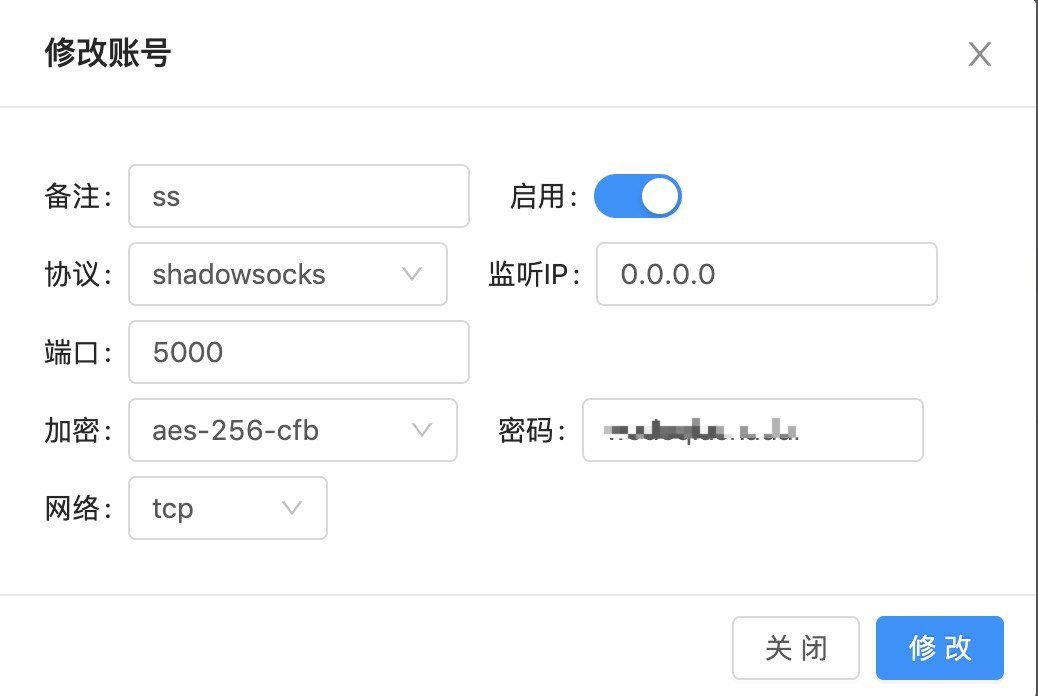
2. shadowsocks
3. WS+TLS+CDN
这个配完之后记得将cloudflare(CDN)的DNS的云朵点亮。
4. WS+TLS+WEB
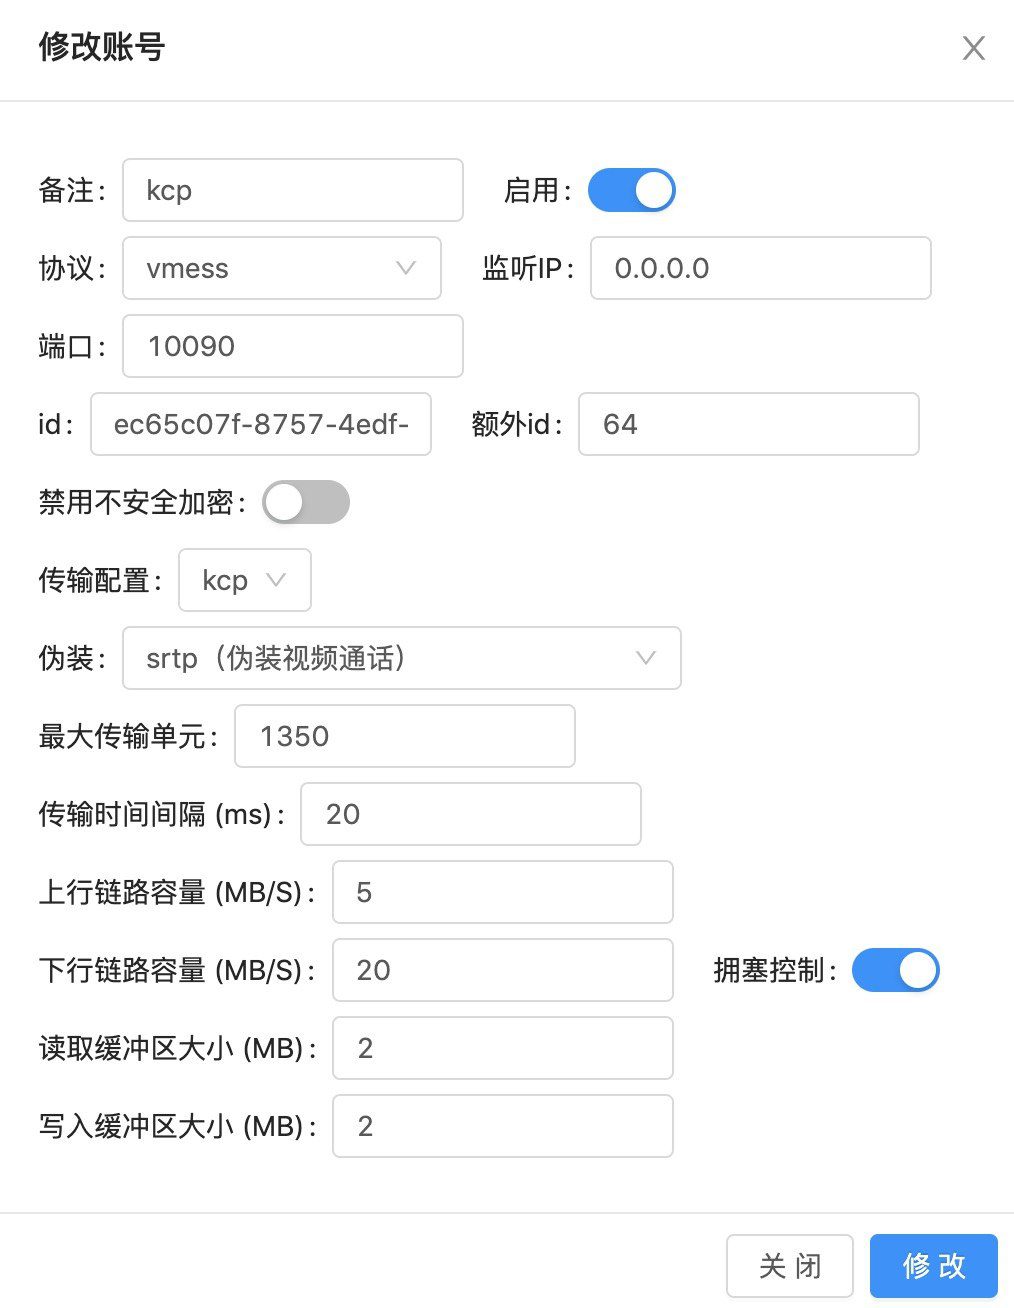
5. KCP
备注
1. v2-ui 管理脚本使用方法:
- v2-ui - 帮助命令(会显示以下所有命令)
- v2-ui start - 启动 v2-ui 面板
- v2-ui stop - 停止 v2-ui 面板
- v2-ui restart - 重启 v2-ui 面板
- v2-ui status - 查看 v2-ui 状态
- v2-ui enable - 设置 v2-ui 开机自启
- v2-ui disable - 取消 v2-ui 开机自启
- v2-ui log - 查看 v2-ui 日志
- v2-ui update - 更新 v2-ui 面板
- v2-ui install - 安装 v2-ui 面板
- v2-ui uninstall - 卸载 v2-ui 面板
2. 判断BBR加速有没有开启成功
输入以下命令:
sysctl net.ipv4.tcp_available_congestion_control
如果返回值为:
net.ipv4.tcp_available_congestion_control = reno cubic bbr
只要后面有bbr,则说明已经开启成功了。
端口相关命令
- netstat -tnlp - 显示当前tcp端口占用情况
- netstat -lp - 显示所有类型端口占用情况
评论